How to use a compass
A compass is part of the 10 essentials and most people take one with them into the mountains. But how in the world does it work? Luckily it isn't too hard to use your compass and when paired with a good map and a bit of know-how it becomes a powerful tool for navigation.
In this article we're going to cover:
- The essential parts of the compass,
- How to set up your compass to account for the declination for your region
- How to take a bearing from a map to find an object in the field and
- How to take a bearing in the field to find yourself on a map
Parts of a compass
Alright let’s look at all the different parts of a compass and what they’re used for.
- The base plate is clear so you can see the map below it and there's always at least one straight edge that you'll use later for taking bearings.
- On the side there are rulers that you can use along with your map's scale to help you calculate distance.
- On top you'll find a direction of travel arrow to remind you which direction to point the compass when you're taking a bearing.
- The big circle is the rotating bezel which is marked with degrees from zero clockwise up to 360.
- Above the bezel is a little marker called the index line which marks where you'll read your bearings.
- Inside the bezel the first thing you'll notice is the magnetized needle which always points to the magnetic north pole; not the true north pole. We'll get into the difference in a minute
- There's also a big arrow called the orienting arrow which you'll use to help you orient the bezel.
- Alongside the orienting arrow are orienting lines that you'll use to help you line up the compass with north on a map.
- Finally some compasses have a handy declination scale which makes it easier to adjust declination.
What is declination
Declination is the angle difference between true north and magnetic north. The needle in your compass will only point to the magnetic north. If you don't adjust your compass to account for the difference between magnetic north and true north, it can really mess up your navigation.
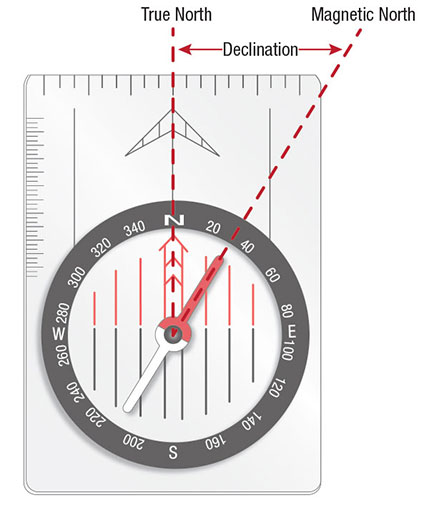
Depending on where you are in the world the declination will be a certain number of degrees to either the west or the east. You can find the direction and number of degrees in the declination diagram near the legend along with the date of the map's most recent revision.
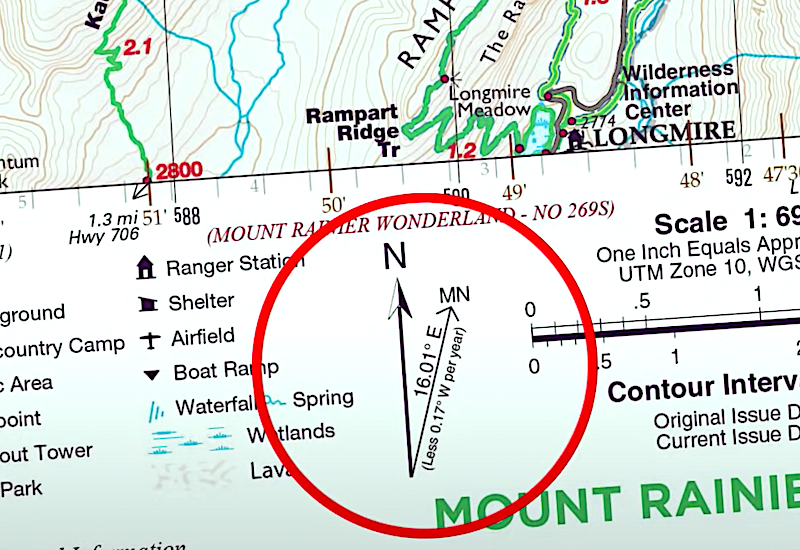
If your map hasn't been revised for several years it's worth looking up the current declination online. Different compass brands set declination in different ways and once you know the declination for your region you can put that information into your compass. When you do and the needle lines up inside the orienting arrow, the north marker on the bezel will point to true north.
The map in the image above has a declination of 16 degrees east. Therefore we need to move the orienting arrow 16 degrees to the east. Now that the declination is set you’ll be set to start using your compass with this map.
Taking a bearing
A bearing describes a direction in terms of degrees. Bearings are way more precise than just saying go east or west. Instead you can say to get to the lake follow a bearing of 79 degrees.
One of the most common ways to use a bearing is when you're out hiking and you want to head to a specific point like a peak or your campsite. If you know where you are on a map it's a simple process.
- Start by finding your current location on the map. Let's say we're at point A.
- Now set your compass on the map so that the straight side of the base plate lines up with your position.
- Next find the point you want to head toward; point B. Rotate the entire compass until it forms a line between point A (your position) and point B (your destination). Make sure the direction of travel arrow is pointing in the direction of your destination (point B).
- Once the compass is in position rotate the bezel until the orienting lines are lined up with north and south on the map. You can use the edge of the map to help you get the lines positioned just right. Remember to make sure that the north marker on the bezel is pointing to north on the map and not South.
- Once the orienting lines are running north south, look at the index line to read the bearing you've just captured. Here it's 188.
- You can use the compass to follow the bearing.
- Hold the compass in front of you with the direction of travel arrow pointing away from you.
- Now rotate your whole body until the north side of the magnetized needle is inside the orienting arrow. The orienting arrow is sometimes called the shed.So just remember red in the shed.
- Once you've got red in the shed you're facing the bearing of 188 and your destination.
Taking a bearing in the field
If you're out hiking and you want to find your location on a map you can also take a bearing off a landmark near you. Then you can transfer that bearing to your map and figure out where you are.
- Start by finding a landmark that you can also identify on your map.
- Hold your compass up with the direction of travel arrow pointing away from you and directly at the landmark.
- Now keep the compass flat and rotate the bezel until the magnetized needle is inside the orienting arrow; or red is in the shed. Once the needle is ‘in the shed’ you've captured the bearing.
A compass with a sighting mirror makes it easy to take very accurate bearings.
- Hold the compass at eye level and point it at the object/landmark
- Tilt the mirror until you can see straight down into the bezel. This way you can see the object and the bezel at the same time. Once you've got the bearing you can transfer it to the map.
- Lay your compass on the map and line up its edge with a known landmark. Make sure that the direction of travel arrow is pointing in the direction of the landmark.
- With the edge of the compass lined up against the object, rotate the entire base plate until the orienting lines are running north south and the north marker on the bezel is pointing to north on the map.
- Once you've finished you can draw a line on the map along the edge of your compass. You are somewhere along this line.
Triangulation
If you want to find your exact position you use a process called triangulation all you have to do is take another bearing but with a different object that's at least 60 degrees away from the first. where the two lines intersect is your position. if you take a third bearing you'll end up with a little triangle and the smaller the triangle the more accurate the reading.
Compass skills can be daunting at first but they get way easier with practice. Get familiar with the techniques described above and then test them out on your favorite trail.